How to Clean the Dust from an Overheating Sony VAIO PCG-GRT260G
Overview
A brief search of the internet revealed that the main shortcoming of the VAIO series of laptops is the lack of cooling capacity. Apparently the overall design of the system is barely sufficient, which is exacerbated by some real design problems. For example, the intake is located on the bottom, which is frequently sitting directly on your leg if you (ironically) hold the laptop in your lap. In addition, the ductwork and heat sinks are easily clogged with dust, which severely limits their efficiency. At the very minimum, this leads to very noisy fan levels, ultimately resulting in spontaneous shutdowns as the internal temperatures begin to exceed critical levels. Apparently these high temperatures can also lead to other problems, such as soldering failures and memory issues, which ultimately cause boot failures.
Models affected apparently also include the PCG-FX, PCG-GR, PCG-GRZ, PCG-GRV, PCG-GRX, and PCG-NV series. However, these models may have slightly different layouts than the one outlined below.
Unfortunately, for such a commonly known problem, I was discouraged to find the lack of step-by-step guides available on how to clean this model. My initial search of Sony’s knowledge base was quite discouraging and unacceptable. From the site http://esupport.sony.com/US/perl/model-faq.pl?mdl=PCGGRT260G
If the computer is not covered by the manufacturers warranty, there will be a charge for these repairs. Sony is not able to determine the cost of these repairs until we evaluate the computer. Once the computer is evaluated, we will be able to provide the exact cost of the repairs needed to resolve the issue
In the first place, I personally do not want to send my entire computer off for such a trivial thing. And I’m supposed to send it to them with no idea what they are going to charge for the service??? I don’t think so.
Next, I found http://www.vaioshutdown.com/overheat.htm. Unfortunately they do not give specific instructions for each model, and again, I do not want to send off the computer, much less pay to have it serviced.
Another resource I found was http://www.hardwareanalysis.com/content/topic/5449/?o=820, but the topic was excessively long, and didn’t appear to have any good details.
So enough with the research, it was time to forge new ground.
Tools
- Small Phillips head screwdriver
- Can of computer compressed air
Disassembly Notes
Step 1
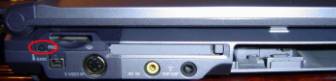
Remove the tiny screw just beside the memory stick slot.
Step 2
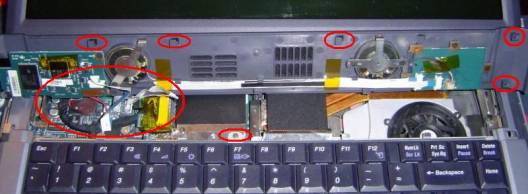
Open the lid, and slide the entire speaker assembly to the left and toward you. Lips under the right and top hold it in place. Once it is loose, flip it up toward the LCD, being careful not to pull any of the wires loose. Then remove the single screw in the center, which holds the keyboard in place.
Step 3
Flip the keyboard down toward you, exposing the internals. Next, take off the fan cover by removing the screws indicated.
Step 4
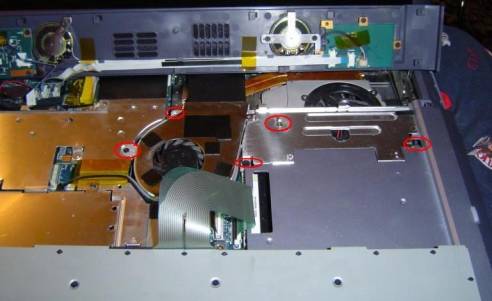
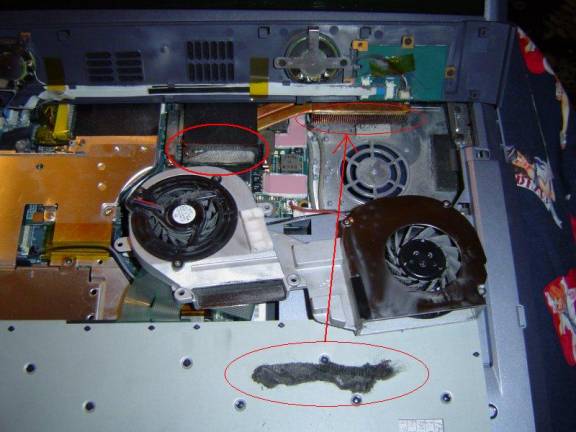
Once the cover is out of the way, remove the remaining screws that hold the fan assembly in place. Be careful with the wiring, and rotate the entire assembly up and toward you, starting with the side closest to the LCD. This will probably reveal a large amount of dust on the right side of the heat sink, as well as a lesser amount of dust on the sink that’s directly above the chip. The fans will also have a fair amount of dust in them. You can see the thick strip of dust that was removed at the bottom of the picture, with the arrow indicating the heat sink it was removed from.
Results
To benchmark, I used Notebook Hardware Control (NHC), which is available as freeware from http://www.pbus-167.com/nhc/nhc.htm. After about 2.5 years of home use, and after leaving the computer on for days at a time under semi-idle conditions (~8% steady CPU usage), the steady temperature was approximately 175F. A minute of 100% CPU usage would send the temperatures soaring above 205F, and ultimately would cause a spontaneous shutdown. After cleaning, steady-state temperatures are now 125F, and 100% CPU usage now only raises temperatures to roughly 150F.
Before cleaning, the fan would run continuously one step below full speed. After removing the dust, it is barely audible.
Solution
To alleviate the problem, the system obviously needs some type of filter. One apparent solution that appears to have potential is to use painter’s tape to tape a small square from a dryer sheet to the fan intake. The disruption to airflow caused by the dryer sheet seems to be minimal, yet it should help capture some of the dust. It appears that the steady-state temperatures have only increased by a degree or two due to the modification.